How to Setup Kubernetes Cluster on Vagrant VMs
Building a Kubernetes 1.23 Cluster

Overview
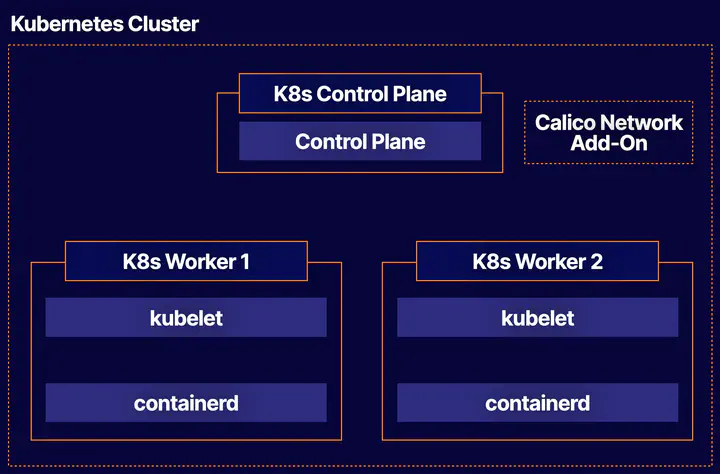
In this guide we will walk through the process of building a new Kubernetes cluster. We will do this manually first to learn some of concepts 📖 first. Then we will automate all this with Vagrant. This will help you build the skills necessary to create your own Kubernetes clusters for your real work.
Downloads
The things that you will need:
Manual Installation
Provision
We would start with 3 Virtual VMs with Ubuntu 20.04 distribution.
Setup
SSH onto the 3 nodes.
ssh cloud_user@<PUBLIC_IP_ADDRESS>
If you wish, you can set an appropriate hostname for each node like below. On the control plane node:
sudo hostnamectl set-hostname k8s-control
On the first worker node:
sudo hostnamectl set-hostname k8s-worker1
On the second worker node:
sudo hostnamectl set-hostname k8s-worker2
On all nodes, set up the hosts file to enable all the nodes to reach each other using these hostnames.
sudo vi /etc/hosts
On all nodes, add the following at the end of the file. You will need to supply the actual private IP address for each node.
<control plane node private IP> k8s-control
<worker node 1 private IP> k8s-worker1
<worker node 2 private IP> k8s-worker2
Install Containerd
Next we will be installing Containerd as our container runtime for our k8s cluster. Install necessary packages first. Log into the Control Plane Node
Note: The following steps must be performed on all three nodes.).
Create configuration file for containerd:
cat <<EOF | sudo tee /etc/modules-load.d/containerd.conf
overlay
br_netfilter
EOF
Load modules:
sudo modprobe overlay
sudo modprobe br_netfilter
Set system configurations for Kubernetes networking:
cat <<EOF | sudo tee /etc/sysctl.d/99-kubernetes-cri.conf
net.bridge.bridge-nf-call-iptables = 1
net.ipv4.ip_forward = 1
net.bridge.bridge-nf-call-ip6tables = 1
EOF
Apply new settings:
sudo sysctl --system
Install containerd:
sudo apt-get update && sudo apt-get install -y containerd
Create default configuration file for containerd:
sudo mkdir -p /etc/containerd
Generate default containerd configuration and save to the newly created default file:
sudo containerd config default | sudo tee /etc/containerd/config.toml
Restart containerd to ensure new configuration file usage:
sudo systemctl restart containerd
Verify that containerd is running.
sudo systemctl status containerd
Disable swap
sudo swapoff -a
Disable swap on startup in /etc/fstab:
sudo sed -i '/ swap / s/^\(.*\)$/#\1/g' /etc/fstab
Install Kubernetes
Start with installing the dependency packages:
sudo apt-get update && sudo apt-get install -y apt-transport-https curl
Download and add GPG key:
curl -s https://packages.cloud.google.com/apt/doc/apt-key.gpg | sudo apt-key add -
Add Kubernetes to repository list:
cat <<EOF | sudo tee /etc/apt/sources.list.d/kubernetes.list
deb https://apt.kubernetes.io/ kubernetes-xenial main
EOF
Update package listings:
sudo apt-get update
Install Kubernetes packages (Note: If you get a dpkg lock message, just wait a minute or two before trying the command again):
sudo apt-get install -y kubelet=1.23.0-00 kubeadm=1.23.0-00 kubectl=1.23.0-00
Log into both Worker Nodes to perform previous steps.
Initialize the Cluster
Initialize the Kubernetes cluster on the control plane node using kubeadm (Note: This is only performed on the Control Plane Node):
sudo kubeadm init --pod-network-cidr 192.168.0.0/16 --kubernetes-version 1.23.0
Set kubectl access:
mkdir -p $HOME/.kube
sudo cp -i /etc/kubernetes/admin.conf $HOME/.kube/config
sudo chown $(id -u):$(id -g) $HOME/.kube/config
Test access to cluster:
kubectl get nodes
Install the Calico Network Add-On On the Control Plane Node, install Calico Networking:
kubectl apply -f https://docs.projectcalico.org/manifests/calico.yaml
Check status of the control plane node:
kubectl get nodes
Join the Worker Nodes
In the Control Plane Node, create the token and copy the kubeadm join command.
NOTE:The join command can also be found in the output from kubeadm init command
kubeadm token create --print-join-command
In both Worker Nodes, paste the kubeadm join command to join the cluster. Use sudo to run it as root:
sudo kubeadm join ...
In the Control Plane Node, view cluster status (Note: You may have to wait a few moments to allow all nodes to become ready):
kubectl get nodes
Turn off automatic updates
sudo apt-mark hold kubelet kubeadm kubectl
Congratulations 👏 — you’ve a functioning ☸️ cluster. I would be honest this was a lot of work 😓. Before we move on let’s automate this next!