Enhance Code Reviews with OpenAI🤖 and GitHub Actions🚀
Transform Your Code Review Process with AI and Automation

Overview
Imagine🤔 this: It’s Friday🍻, and you’ve just finished coding a complex piece of functionality. However, your teammates have already signed off for the weekend, leaving your code unreviewed until next week. What if there was a programmer buddy who could take a look, every time you pushed code into GitHub, scans your code, highlights potential issues, suggests improvements, and even points out best practices. It’s like having a second set of eyes👀 – but those eyes never get tired or miss a detail.
What if you could elevate your code review process, making it faster, smarter, and more consistent without sacrificing quality? Meet the game-changing duo: OpenAI-powered code reviews via GitHub Actions.
We’ll take an MVP approach (Minimum Viable Product) for our GitHub Action with only the required parts to understand the basics, then we’ll add more functionality to it.
Let’s dive🐬 in!
Prerequisites
The things that you will need:
Step 1: Action Definition
The definition is stored in the
action.ymlfile, put directly in the root of the repository.The most minimal action definition is composed of a
nameand arunsobject to define how the action is executed and what file to run.descriptionandauthorare optional.When publishing the action to the store, you might want to customize the appearance of the action in the marketplace. This can be done by adding a
brandingobject to theaction.ymlfile.name: "Open-AI Code Review Action" description: "Perform code reviews and comment on diffs using OpenAI API." author: "Avijit Chatterjee" runs: using: "node20" main: "dist/index.js" branding: icon: "aperture" color: "green"
Step 2: Project setup
- Let’s create an empty node project with
npm init -y. - You can now open
package.jsonin your favorite IDE and add the build script:{ "scripts": { "build": "tsc" } } - Since we want to use Typescript, we’ll need to install it as a dev dependency:
npm install -D typescript - Then we’ll create a
tsconfig.jsonby runningnpx tsc --initand we’ll edit it to match our needs:{ "compilerOptions": { "target": "ES2019", "module": "commonjs", "outDir": "dist", "esModuleInterop": true, "forceConsistentCasingInFileNames": true, "strict": true, "skipLibCheck": true } }
Step 3: Project code
- We can now create the
src/index.tsfile and start writing our action.We’re building an MVP, right? So let’s keep it simple for now and focus on all the required steps. We’ll have time to expand it later.console.log('Hello World!');
Step 4: Building the action
We can now
buildthe action by runningnpm run buildwhich will execute thetsccommand as we defined in thepackage.jsonfile. This will create adistfolder containing the compiled code.dist └── index.js
outDir option in the tsconfig.json file, it was set to dist in Step 2.Step 5: Creating the repository
It’s time to create a
gitrepository as we’ll need to push our code to GitHub.git initAdd a
.gitignorefile to the project to avoid committing files that shouldn’t be tracked by git, for example, thenode_modulesfolder. A quick way to do it is by runningnpx gitignore nodewhich will create a.gitignorefile with the most common entries for a node project. Commit and Push!git add . git commit -m "Initial commit" git remote add origin <remote-url> git push -u origin main
dist folder to GitHub, so we’ll need to remove the dist entry from the.gitignore file.Step 6: Creating a workflow
GitHub Actions are executed by
workflows. A workflow is defined in a.ymlfile stored in the.github/workflowsfolder of the repository so let’s create it.mkdir -p .github/workflows touch .github/workflows/greet.ymlIn our case, the action will checkout the current repository and then run the action we just created. We put
./as the action path because we want to run the action from the current repository, but we could also use a different repository.How does GitHub know what action to run? It’s defined in the
action.ymlfile we created earlier.One more line worth pointing🫵 is
on: workflow_dispatchwhich tells GitHub to run the workflow when we manually trigger it from the Actions tab.name: Say Hello on: workflow_dispatch: jobs: run-my-action: name: Checks if this action works runs-on: ubuntu-latest steps: - uses: actions/checkout@v3 - uses: ./
Step 7: Running the workflow
We can now push our code to GitHub and see the action in action!
git add .
git commit -m "Add workflow"
git push
Once the code is pushed, we can go to the
Actionstab and trigger the workflow manually.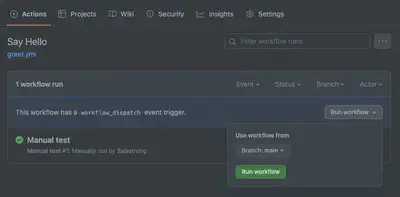
The workflow will start running and we’ll see the logs of the action in the console.

Congratulations!🙌 You just created and ran your first GitHub Action!
Now let’s build on the MVP and add code for our use case.
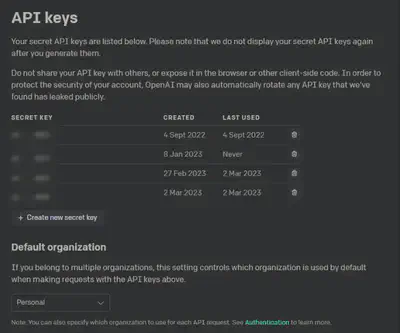
Step 8: Create an OpenAI API Key
- First, you’ll need an OpenAI API
Key🗝️ to give as an input. So let’s create one… - You can get one from OpenAl’s website, which usually comes with some free🆓 credit!
After that, the cost is $0.002 per token. You can generate approximately 750,000 words for $2. Once you click ‘Create a new secret key’ - you will only be shown it once, so copy and save it right away, or you’ll have to create a new one.
Step 9: Add the Inputs
For our Code Review🕵🏼 use case , our GitHub Action requires specific inputs, which are defined within the
inputsobject of theaction.ymlfile:GITHUB_TOKEN: In order to add comments to a Pull Request, we need to use the GitHub REST API. To authenticate your requests to GitHub, you will need to provide this authentication tokenOPENAI_API_KEY: To make authenticated requests to the OpenAI APIOPENAI_API_MODEL: Making the choice of LLM configurable.MAX_TOKENS: Your rate limit to avoid the unexpected.exclude: Glob patterns to exclude files from the diff analysiscustom_prompts:LLMPrompt for Code Review action
name: "Open-AI Code Review Action"
description: "Perform code reviews and comment on diffs using OpenAI API."
inputs:
  GITHUB_TOKEN:
    description: "GitHub token to interact with the repository."
    required: true
  OPENAI_API_KEY:
    description: "OpenAI API key for GPT."
    required: true
  OPENAI_API_MODEL:
    description: "OpenAI API model."
    required: false
    default: "gpt-4"
  max_tokens:
    description: "Maximum number of tokens that can be generated per analysis."
    required: false
    default: "700"
  exclude:
    description: "Glob patterns to exclude files from the diff analysis"
    required: false
    default: ""
  custom_prompts:
    description: "Custom commands to augment the agent's prompts with. Each line is an individual command."
    required: false
    default: ""
runs:
  using: "node20"
  main: "dist/index.js"
branding:
  icon: "aperture"
  color: "green"
Step 10: Create the code-review workflow:
- Replace the
greet.ymlworkflow with thecode-review.ymlworkflow. - Note🫵 instead of triggering manually i.e.
on: workflow_dispatchwe trigger the actionon: pull_requestbeing opened/synchronize/ready_for_review for review. - We provide the input values for the action to run with as defined in the
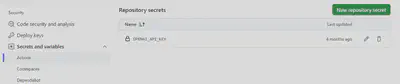
action.yml - Since we intend to push this code upto GitHub we are using Github Secrets to pass on secrets.
code-review.yml
name: Code Review with OpenAI

on:
  pull_request:
    types:
      - opened
      - synchronize
      - ready_for_review
permissions: write-all
jobs:
  code_review:
    if: '! github.event.pull_request.draft'
    runs-on: ubuntu-latest
    steps:
      - name: Checkout repository
        uses: actions/checkout@v3
      - name: Code Review
        uses: ./
        with:
          GITHUB_TOKEN: ${{ secrets.GITHUB_TOKEN }}
          OPENAI_API_KEY: ${{ secrets.OPENAI_API_KEY }}
          OPENAI_API_MODEL: "gpt-3.5-turbo"
          exclude: "yarn.lock, dist/**, **/*.json, **/*.md, **/*.yaml, **/*.xml"
          custom_prompts: |
            Do not worry about the verbosity of variable names, as long as they are somewhat descriptive.
            Be sure to call out concurrency issues and potential race conditions.
            Do not worry about things a static analyzer would catch in real-time during development.
Step 11: Add the Dependencies
Install the dependencies and dev-dependencies we would need:
@actions/core: Core functionalities for
GitHub Actions.openai: OpenAI client for interacting with the
OpenAI API.@octokit/rest: GitHub
REST APIclient.parse-diff: Library for parsing diffs.
minimatch: Library for matching file paths against glob patterns.
npm install <dependency>@vercel/ncc: Build tool that is designed to compile a
Node.jsproject into a single file, which includes all its dependencies.jest: The core testing framework.
ts-jest: Transforms TypeScript to JavaScript, allowing Jest to work with TypeScript code.
@types/jest: Provides type definitions for Jest, enabling you to write type-safe tests in TypeScript.
npm install --save-dev <dependency>
Step 11: Fix Build Setup
When creating
GitHub Actions, you often need to ensure that your action and all its dependencies are available in the GitHub Actions runner environment. By using@vercel/ncc, you can bundle📦 everything into a single file, making it easier to distribute and use.We need to update our build script in
package.jsonto use it."build": "tsc && ncc build lib/index.js"We also need to change
outDirintsconfig.jsonto lib."outDir": "lib"You might also want to double-check that
libis in your.gitignorefile butdistis not. This is our desired behavior as lib will only have our code in javascript, but dist will have the whole action.We can now run
npm run buildagain, then commit and push the changes.
Step 12: Update the Action code
src/index.ts
// Import necessary modules
import { readFileSync } from "fs";
import * as core from "@actions/core";
import OpenAI from "openai";
import { Octokit } from "@octokit/rest";
import parseDiff, { Chunk, File } from "parse-diff";
import minimatch from "minimatch";

// Retrieve inputs from GitHub Actions
const GITHUB_TOKEN: string = core.getInput("GITHUB_TOKEN");
const OPENAI_API_KEY: string = core.getInput("OPENAI_API_KEY");
const OPENAI_API_MODEL: string = core.getInput("OPENAI_API_MODEL");
const MAX_TOKENS: number = Number(core.getInput("max_tokens"));

// Initialize Octokit (GitHub API client)
const octokit = new Octokit({ auth: GITHUB_TOKEN });

// Initialize OpenAI client
const openai = new OpenAI({
  apiKey: OPENAI_API_KEY,
});

// Interface to define the structure of pull request details
interface PRDetails {
  owner: string;
  repo: string;
  pull_number: number;
  title: string;
  description: string;
}

// Function to get details of the pull request
export async function getPRDetails(): Promise<PRDetails> {
  const { repository, number } = JSON.parse(
    readFileSync(process.env.GITHUB_EVENT_PATH || "", "utf8")
  );
  const prResponse = await octokit.pulls.get({
    owner: repository.owner.login,
    repo: repository.name,
    pull_number: number,
  });
  return {
    owner: repository.owner.login,
    repo: repository.name,
    pull_number: number,
    title: prResponse.data.title ?? "",
    description: prResponse.data.body ?? "",
  };
}

// Function to get the diff of the pull request
export async function getDiff(
  owner: string,
  repo: string,
  pull_number: number
): Promise<string | null> {
  const response = await octokit.pulls.get({
    owner,
    repo,
    pull_number,
    mediaType: { format: "diff" },
  });
  // @ts-expect-error - response.data is a string
  return response.data;
}

// Function to analyze code and create comments using OpenAI
export async function analyzeCode(
  parsedDiff: File[],
  prDetails: PRDetails,
  customPrompts: string
): Promise<Array<{ body: string; path: string; line: number }>> {
  const comments: Array<{ body: string; path: string; line: number }> = [];

  for (const file of parsedDiff) {
    if (file.to === "/dev/null") continue; // Ignore deleted files
    for (const chunk of file.chunks) {
      const prompt = createPrompt(file, chunk, prDetails, customPrompts);
      const aiResponse = await getAIResponse(prompt);

      console.log(`Prompt = ${prompt}`);
      console.log(`Response: ${aiResponse}`);
      console.log("---------");

      if (aiResponse) {
        const newComments = createComment(file, chunk, aiResponse);
        if (newComments) {
          comments.push(...newComments);
        }
      }
    }
  }
  return comments;
}

// Function to create the prompt for OpenAI based on file changes and pull request details
export function createPrompt(file: File, chunk: Chunk, prDetails: PRDetails, customPrompts: string): string {
  return `Your task is to review pull requests. Instructions:
- Provide the response in following JSON format:  {"reviews": [{"lineNumber":  <line_number>, "reviewComment": "<review comment>"}]}
- Do not give positive comments or compliments.
- Provide comments and suggestions ONLY if there is something to improve, otherwise "reviews" should be an empty array.
- Write the comment in GitHub Markdown format.
- Use the given description only for the overall context and only comment the code.
- IMPORTANT: NEVER suggest adding comments to the code.
${customPrompts}

Review the following code diff in the file "${file.to}" and take the pull request title and description into account when writing the response.

Pull request title: ${prDetails.title}
Pull request description:

---
${prDetails.description}
---

Git diff to review:

\`\`\`diff
${chunk.content}
${chunk.changes
  // @ts-expect-error - ln and ln2 exists where needed
  .map((c) => `${c.ln ? c.ln : c.ln2} ${c.content}`)
  .join("\n")}
\`\`\`
`;
}

// Function to get a response from OpenAI based on the prompt
export async function getAIResponse(prompt: string): Promise<Array<{
  lineNumber: string;
  reviewComment: string;
}> | null> {
  const queryConfig = {
    model: OPENAI_API_MODEL,
    temperature: 0.2,
    max_tokens: MAX_TOKENS,
    top_p: 1,
    frequency_penalty: 0,
    presence_penalty: 0,
  };

  try {
    const response = await openai.chat.completions.create({
      ...queryConfig,
      // Return JSON if the model supports it:
      ...(OPENAI_API_MODEL === "gpt-4-turbo-preview" || OPENAI_API_MODEL === "gpt-4-turbo" || OPENAI_API_MODEL === "gpt-3.5-turbo" || OPENAI_API_MODEL === "gpt-4-0125-preview" || OPENAI_API_MODEL === "gpt-4-1106-preview" || OPENAI_API_MODEL === "gpt-3.5-turbo-0125" || OPENAI_API_MODEL === "gpt-3.5-turbo-1106"
        ? { response_format: { type: "json_object" } }
        : {}),
      messages: [
        {
          role: "system",
          content: prompt,
        },
      ],
    });

    const res = response.choices[0].message?.content?.trim() || "{}";

    return JSON.parse(res).reviews;
  } catch (error) {
    console.error("Error:", error);
    return null;
  }
}

// Function to create comments based on AI response
export function createComment(
  file: File,
  chunk: Chunk,
  aiResponses: Array<{
    lineNumber: string;
    reviewComment: string;
  }>
): Array<{ body: string; path: string; line: number }> {
  return aiResponses.flatMap((aiResponse) => {
    if (!file.to) {
      return [];
    }
    return {
      body: aiResponse.reviewComment,
      path: file.to,
      line: Number(aiResponse.lineNumber),
    };
  });
}

// Function to create review comments on GitHub
export async function createReviewComment(
  owner: string,
  repo: string,
  pull_number: number,
  comments: Array<{ body: string; path: string; line: number }>
): Promise<void> {
  await octokit.pulls.createReview({
    owner,
    repo,
    pull_number,
    comments,
    event: "COMMENT",
  });
}

// Main function to orchestrate the workflow
export async function main() {
  const prDetails = await getPRDetails();
  let diff: string | null;
  const eventData = JSON.parse(
    readFileSync(process.env.GITHUB_EVENT_PATH ?? "", "utf8")
  );

  if (eventData.action === "opened") {
    diff = await getDiff(
      prDetails.owner,
      prDetails.repo,
      prDetails.pull_number
    );
  } else if (eventData.action === "synchronize") {
    const newBaseSha = eventData.before;
    const newHeadSha = eventData.after;

    const response = await octokit.repos.compareCommits({
      headers: {
        accept: "application/vnd.github.v3.diff",
      },
      owner: prDetails.owner,
      repo: prDetails.repo,
      base: newBaseSha,
      head: newHeadSha,
    });

    diff = String(response.data);
  } else {
    console.log("Unsupported event:", process.env.GITHUB_EVENT_NAME);
    return;
  }

  if (!diff) {
    console.log("No diff found");
    return;
  }

  const parsedDiff = parseDiff(diff);

  const excludePatterns = core
    .getInput("exclude")
    .split(",")
    .map((s) => s.trim());

  const filteredDiff = parsedDiff.filter((file) => {
    return !excludePatterns.some((pattern) =>
      minimatch(file.to ?? "", pattern)
    );
  });

  const customPrompts = core.getMultilineInput("custom_prompts")
      .map(customPrompt => `- ${customPrompt}`)
      .join("\n");

  const comments = await analyzeCode(filteredDiff, prDetails, customPrompts);
  if (comments.length > 0) {
    await createReviewComment(
      prDetails.owner,
      prDetails.repo,
      prDetails.pull_number,
      comments
    );
  }
}

// Execute the main function and handle errors
main().catch((error) => {
  console.error("Error:", error);
  process.exit(1);
});
Step 13: Test Setup
You wouldn’t push code into production without testing🧪 it, right? So let’s write some tests for our action.
We need to create a new config file for jest, in the root of our project, called
jest.config.json.We’re telling jest to use the
ts-jestpreset, to run the tests in node, to collect coverage and to ignore some files.{ "preset": "ts-jest", "testEnvironment": "node", "collectCoverage": true, "coverageReporters": ["lcov", "text-summary"], "collectCoverageFrom": ["src/**/*.ts"], "coveragePathIgnorePatterns": ["/node_modules/", "/__tests__/"], "testPathIgnorePatterns": ["/node_modules/"] }Without any extra configuration, the build will also include test files, which we don’t want. On
tsconfig.json, we can add a new exclude property:"exclude": ["node_modules", "**/*.test.ts"]
Step 14: Writing the tests
- We can now create a new file called index.test.ts in the
src/__tests__folder. This is where we’ll write our tests.
Step 15: Running the tests
- Now it’s finally time to get rid of that “test”: “echo "Error: no test specified" && exit 1” script in package.json. Just replace it with:
"test": "jest" - This will run jest with the configuration we just created. If you want to run the tests in watch mode, you can use
jest --watch. - We can now run
npm testto run the tests. You should see something like this. Our action works as intended and we have some tests to prove it!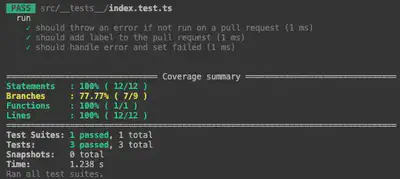
Step 16: Publishing the action
If you remember we mentioned the branding section in the
action.ymlfile. Let’s see what it’s all about.branding: icon: 'activity' color: 'green'This will add a nice icon and a color to your action in the GitHub Marketplace. You can find the list of available icons here.
How do we publish our action? Just look at your GitHub repo. If you’ve properly set up an
action.ymlfile, you should see a banner at the top of the page like this one:
Step 17: Using your action
Step 18: DX - Build Automation
Step 19: Formatting & Linting
Wrapping It Up 🎁
🚀 Embrace the Future of Code Reviews with AI!
Automating code reviews using AI can significantly enhance the efficiency, consistency, and quality of your development process. This automation doesn’t just save precious developer hours🕒, but also ensures potential issues are caught early in the development cycle i.e ⬅️SHIFT LEFT
Get Inspired
- 👩💻 GitHub Actions Marketplace: Discover pre-built actions created by the community and see how others are automating their workflows.
- 📚 GitHub Learning Lab: Interactive courses to help you learn about GitHub, GitHub Actions, and more.
Avijit Chatterjee
Principal Software Engineer
Reactive programming enthusiast keen on learning new technologies