Transform Your Deployment Strategy
Crafting a DevOps Blue/Green Pipeline with Amazon ECS!
Overview
Let’s kick things off with a monolithic application and experience the ⚡ speed and 🚀 agility that AWS offers. You’ll also achieve zero-downtime deployments 🔄, even with distributed development teams collaborating on a shared codebase!
We’ll take a AWS Console walk through approach here to understand the concepts and look under the hood🔧, the process of:
- Auto-generating a Monolithic project: We’ll kick off by creating a
Todo Managementapplication using the JHipster platform.
Angular, React, and Vue and mobile app support for Ionic and React Native! On the backend, it support Spring Boot (with Java or Kotlin), Micronaut, Quarkus, Node.js, and .NET.- Containerizing the Application: Next, we’ll containerize the
Todo Managementmonolith and host its database on Amazon Relational Database Service (RDS). - Implementing a CI/CD Pipeline: We’ll set up a DevOps CI/CD pipeline using a blue/green architecture on AWS, leveraging Amazon Elastic Container Service (
ECS). - Deployment Options: We’ll explore two key deployment options for the containerized monolith on Amazon ECS:
- Amazon
EC2: Manage your own fleet of EC2 servers to host containers. - AWS
Fargate: Experience serverless compute for containers—no need to manage any EC2 fleet!
- Amazon
Prerequisites
The things that you will need:
- 👉 Install Java (
21) - 👉 Install Node(
20) - 👉 Install Docker
- 👉 GitHub Account
- 👉 AWS Account
Optional installations:
- Install a Java build tool: Whether you choose to use
MavenorGradle, you normally don’t have to install anything, asJHipsterwill automatically install theMaven Wrapperor theGradle Wrapperfor you. If you don’t want to use those wrappers, go to the official Maven website or Gradle website to do your own installation. - Install IDE: Install VSCode or your ❤️ IDE
SpringBoot, Java, Node… So if you are following along please verify compatibility and install JDK and Node versions accordingly.Step 1: Create Monolith Application
- Open the Jhipster Online
- In the main pane, choose
Create Application. - Override below given default values:
- Under Application Name & Repository Name, mention
todomgmt - Under What is your default Java package name?, mention
com.example.todomgmt - Under Which type of database would you like to use?, pick
SQL - Under Which production database would you like to use?, pick
PostgreSQL - Under Which development database would you like to use? pick
H2 with disk-based persistence - Under Do you want to use the Spring cache abstraction?, select
No - Under Would you like to use Maven or Gradle for building the backend?, choose
Gradle - Under Please choose additional languages to install, choose your choice of additional language.
- Select Download as Zip file,
todomgmt.zipfile will be download on your local machine.
- Under Application Name & Repository Name, mention
Step 2: Containerize Monolith Application
In order to containerize our
Todo Managementmonolith application, we will need theDockerfileandentrypoint.shfiles:Dockerfile
FROM amazoncorretto:21-alpine

ENV SPRING_OUTPUT_ANSI_ENABLED=ALWAYS \
    JHIPSTER_SLEEP=0 \
    JAVA_OPTS=""

# Add a jhipster user to run our application so that it doesn't need to run as root
RUN adduser -D -s /bin/sh jhipster
WORKDIR /home/jhipster

COPY build/libs/todomgmt-0.0.1-SNAPSHOT.war app.war

ADD entrypoint.sh entrypoint.sh
RUN chmod 755 entrypoint.sh && chown jhipster:jhipster entrypoint.sh
USER jhipster

ENTRYPOINT ["./entrypoint.sh"]

EXPOSE 8080
entrypoint.sh
#!/bin/sh

echo "The application will start in ${JHIPSTER_SLEEP}s..." && sleep ${JHIPSTER_SLEEP}
exec java ${JAVA_OPTS} -Djava.security.egd=file:/dev/./urandom -jar "${HOME}/app.war" "$@"
Build the application with the
productionflag. This command may take ~ 3 - 5 mins../gradlew bootWar -Pprod -PwarCreate a
dockerimage.docker build -t todomgmt .Test your application locally using
docker-compose.docker-compose -f src/main/docker/app.yml upTest the Application by signing in.
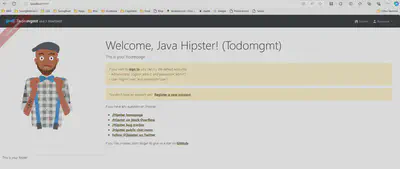
Great, Congratulations !!!🎉 You have successfully created and containerized a Java and Angular based Monolith Application. Let’s learn and explore the next section for deploying a containerized Monolith Application through AWS DevOps services.
Step 3: Create required AWS IAM Roles
Task Execution Role: The task execution role grants the
Amazon ECScontainer andFargateagents permission to make AWS API calls on your behalf. The task executionIAM roleis required depending on the requirements of your task. You can have multiple task execution roles for different purposes and services associated with your account.To create the
ecsTaskExecutionRoleIAM role:Open the
IAMconsoleIn the navigation pane, choose Roles, Create Role.
In the Trusted Entity type, select
AWS ServiceUnder Use case, select
Elastic Container ServiceandElastic Container Service Task, then choose Next: Permissions.In the Attach permissions policy section, search for
AmazonECSTaskExecutionRolePolicy, select the policy, and then choose Next: Review.For Role Name, type
ecsTaskExecutionRoleand choose Create role.Please save value of the
Role ARNto use in the later step.
ECS Container Instance Role: This IAM role is required for the EC2 launch type. The Amazon ECS container agent makes calls to the Amazon ECS API on your behalf. Container instances that run the agent require an IAM policy and role for the service to know that the agent belongs to you.
To create the
ecsInstanceRoleIAM role:Open the IAM console
In the navigation pane, choose Roles, Create role.
In the Trusted Entity type, select
AWS ServiceUnder Use case, select
EC2, then choose Next: Permissions.In the Attach permissions policy section, search for
AmazonEC2ContainerServiceforEC2Role, select the policy, and then choose Next: Review.For Role Name, type
ecsInstanceRoleand choose Create role.
ECS CodeDeploy Role: Before you can use the
CodeDeployblue/green deployment type with Amazon ECS, the CodeDeploy service needs permissions to update your Amazon ECS service on your behalf. These permissions are provided by the CodeDeployIAM role.To create the
ecsCodeDeployRoleIAM role:Open the IAM console
In the navigation pane, choose Roles, Create role.
In the Trusted Entity type, select
AWS ServiceUnder Use case, select
CodeDeployandCodeDeploy - ECS, then choose Next: Permissions.In the Attach permissions policy section,
AWSCodeDeployRoleForECSpolicy should come as selected, choose Next: Review.For Role Name, type
ecsCodeDeployRoleand choose Create role.
Service Linked Role for Amazon ECS: Amazon ECS uses the service-linked role named
AWSServiceRoleForECSto enable Amazon ECS to call AWS APIs on your behalf. The AWSServiceRoleForECS service-linked role trusts theecs.amazonaws.comservice principal to assume the role. Under most circumstances, this role should already exist, if notTo create a service-linked role (CLI):
aws iam create-service-linked-role --aws-service-name ecs.amazonaws.com
Service Linked Role for Amazon EC2 Auto Scaling: Amazon EC2 Auto Scaling uses service-linked roles for the permissions that it requires to call other AWS services on your behalf. Amazon EC2 Auto Scaling uses the
AWSServiceRoleForAutoScalingservice-linked role. Under most circumstances, this role should already exist, if notTo create a service-linked role (CLI):
aws iam create-service-linked-role --aws-service-name autoscaling.amazonaws.com
Step 4: Create GitHub repository
- We will need a code repository for storing the
Todo ManagementMonolith Application source code. You can use anyCodePipelinesource action supported source control system. For this post, we will useGitHub.
Here’s my GitHub repo.
Step 5: Create Container repository
- Open the Amazon
ECR console. - In the navigation pane, choose
Repositories. - On the Repositories page, choose Create repository.
- For Visibility settings, choose
Private. - For Repository name, enter a unique name for your repository
devops/todomgmtdemo - For Tag immutability, keep it
Mutable. Repositories configured with immutable tags will prevent image tags from being overwritten. - For Scan on push, keep it
Disabled. Repositories configured to scan on push will start an image scan whenever an image is pushed, otherwise image scans need to be started manually. - For Encryption settings, keep the default
AES-256. You can also use AWS Key Management Service (KMS) to encrypt images stored in this repository, instead of using the default encryption settings. - Choose Create repository.
- Please save value of the
Repository URLto use in the later section.
Step 6: Create Aurora PostgreSQL DB
In this section, we will setup
Aurora PostgreSQLRDS withMulti-AZconfiguration.- Sign in to the AWS Management Console and open the Amazon
RDS console. - In the navigation pane, choose Databases. Choose Create database.
- In Choose a Database Creation Method, choose
Standard Create. - In Engine options, choose
Aurora(PostgreSQL Compatible). - In Templates, choose
Dev/Testtemplate. - In the DB cluster identifier field, give Aurora DB cluster name,
todomgmtdb-cluster - To enter your master password, do the following in Credential Settings:
- Pick Self Managed and clear Auto generate a password check box.
- Enter Master password value of your choice and enter the same password in Confirm password.
- For Cluster storage configuration pick
Aurora Standard - For Instance configuration, choose
db.t4g.mediumunder Burstable classes (includes t classes) - For Availability & Durability, choose
Create an Aurora Replica/Readernode in a different AZ (recommended for scaled availability) - Keep defaults for Connectivity, Babelfish settings, Database authentication, Monitoring sections.
- For Additional Configuration, enter
todomgmtdbunder Initial Database Name. - Choose Create database.
- For Databases, choose the name of the new Aurora DB cluster.
- On the Connectivity & Security tab, note the port and the endpoint of the writer DB instance. Please save value of the
endpointandportof the cluster. Endpoint URL should be of formattodomgmtdb-cluster.cluster-UNIQUEID.AWSREGION.rds.amazonaws.com - Click on Writer Node and on the Connectivity & Security tab, please save value of the Security Group Id under Security section (i.e.
sg-xxxxxxxx).
- Sign in to the AWS Management Console and open the Amazon
Step 7: Create Application Load Balancer
- In this section, we will create an Amazon EC2
Application Load Balancer. This will be the public endpoint to accessTodo ManagementMonolith Application. - The load balancer must use a
VPCwith two public subnets in differentAvailability Zones. In these steps, we create a load balancer, and then create two target groups for our load balancer. - First create Target Groups for the
Load Balancer- Sign in to the AWS Management Console and open the Amazon EC2 console
- In the navigation pane, choose Target Groups and select Create Target Group.
- Under Basic configuration, select
IP addressestarget type. - In Name, enter a target group name
alb-tg-todomgmtdemo-1 - In Protocol choose
HTTP. In Port, enter80. - Keep rest of the settings as defaults.
- Select Next: Register Targets.
- Select Create Target Group.
- Repeat above steps to create another target group for Protocol
HTTPand Port8080, name italb-tg-tripmgmtdemo-2
ARN value of your first target group. This ARN is used in the create-service JSON file in the next section.To create an Amazon EC2
Application Load Balancer- Sign in to the AWS Management Console and open the Amazon
EC2 console - In the navigation pane, choose Load Balancers, choose Create Load Balancer.
- Choose Application Load Balancer, and then choose Create.
- In Name, enter the name of your load balancer
todomgmtdemo-alb - In Scheme, choose
Internet-Facing. - In IP address type, choose
IPv4. - Under Network mapping, in VPC, choose the default VPC, and then choose any two availability zones under Mappings. Please save value of the Availability Zone / Subnet ids in the open text file to use in the later section of the workshop.
- Under Security groups, choose Create new security group
- Give ALBSecurityGroup under Security group name
- Add Inbound Rule, Allow 80 port (HTTP) inbound traffic from My IP
- Add Inbound Rule, Allow 8080 port (CustomTCPPort) inbound traffic from My IP
- Select Create security group
- Please save value of the newly created Security Group Id (i.e. sg-xxxxxxxx..) in the open text file to use in the later section of the workshop.
- Come back to Create Application Load Balancer tab, refresh Security groups and select newly created Security group, removing any existing pre-selected Security groups.
- Under Listeners and routing, configure two listener ports for your load balancer:
- Under Protocol, choose HTTP, and Under Port, enter 80.
- Under Default action, select alb-tg-tripmgmtdemo-1 Target Group.
- Choose Add listener.
- Under Protocol, choose HTTP, and Under Port, enter 8080.
- Under Default action, select alb-tg-tripmgmtdemo-2 Target Group.
- Choose Create load balancer.
- Go to Load Balancers and click on the newly created load balancer. From the Description tab, please save value of the DNS name of the Load Balancer in the open text file to use in the later section of the workshop.
- Sign in to the AWS Management Console and open the Amazon
Step 8: Create ECS Cluster
Step 9: Create ECS Task
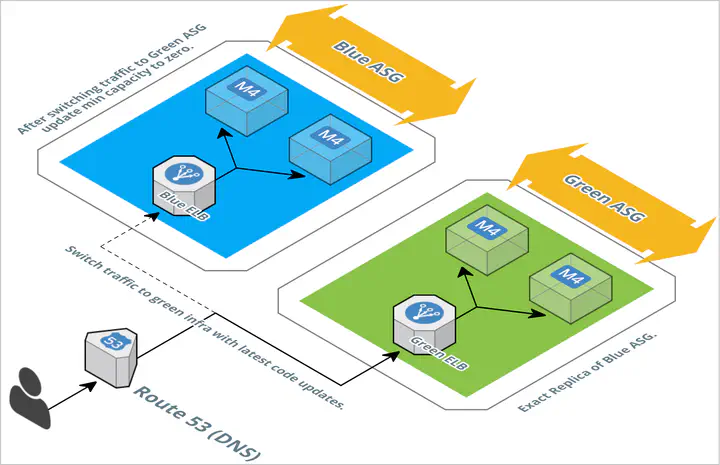
Step 10: DevOps Pipeline with Blue/Green Deployment
Step 11: Setup CodeBuild Project
Step 12: Deploy on Amazon ECS with EC2
Step 13: Deploy on Amazon ECS with Fargate
Step 14: Cleanup 🧹
Wrapping It Up 🎁
Avijit Chatterjee
Reactive programming enthusiast keen on learning new technologies