Hypermedia-Driven REST services
Overview
Spring Data REST is part of the umbrella Spring Data project and makes it easy to build hypermedia-driven REST web services on top of Spring Data repositories.
In this project I will explain the basics of Spring Data REST and show how to use it to build a simple REST API.
Maven Dependencies
We start with Spring Initializer and add the following dependencies. (Rest Repositories, Spring Data JPA, and H2 Database).
To avoid any extra setup, we will use the H2 embedded database for now and later switch to MySQL as a persistent store.
pom.xml
<?xml version="1.0" encoding="UTF-8"?>
<project xmlns="http://maven.apache.org/POM/4.0.0" xmlns:xsi="http://www.w3.org/2001/XMLSchema-instance"
	xsi:schemaLocation="http://maven.apache.org/POM/4.0.0 https://maven.apache.org/xsd/maven-4.0.0.xsd">
	<modelVersion>4.0.0</modelVersion>
	<parent>
		<groupId>org.springframework.boot</groupId>
		<artifactId>spring-boot-starter-parent</artifactId>
		<version>2.4.5</version>
		<relativePath/> <!-- lookup parent from repository -->
	</parent>
	<groupId>host.honeycomb.user.service</groupId>
	<artifactId>user-service</artifactId>
	<version>0.0.1-SNAPSHOT</version>
	<name>user-service</name>
	<description>Demo project for Spring Boot</description>
	<properties>
		<java.version>1.8</java.version>
	</properties>
	<dependencies>
		<dependency>
			<groupId>org.springframework.boot</groupId>
			<artifactId>spring-boot-starter-data-jpa</artifactId>
		</dependency>
		<dependency>
			<groupId>org.springframework.boot</groupId>
			<artifactId>spring-boot-starter-data-rest</artifactId>
		</dependency>

		<dependency>
			<groupId>com.h2database</groupId>
			<artifactId>h2</artifactId>
			<scope>runtime</scope>
		</dependency>
		<dependency>
			<groupId>org.springframework.boot</groupId>
			<artifactId>spring-boot-starter-test</artifactId>
			<scope>test</scope>
		</dependency>
	</dependencies>

	<build>
		<plugins>
			<plugin>
				<groupId>org.springframework.boot</groupId>
				<artifactId>spring-boot-maven-plugin</artifactId>
			</plugin>
		</plugins>
	</build>

</project>
Writing the Application
As a best design best practice we would like to use domain driven design principles. This will to break down our complex business domains into manageable, functional bounded contexts. Each bounded context will expose it’s business capabilities as consumable business API’s.
Create your Domain Objects
We will start by writing the domain objects to represent a user of our website. Will also look at how to work with relationships between entities in Spring Data REST. We will focus on the association resources that Spring Data REST exposes for a repository, considering each type of relationship that can be defined.
One-to-One Relationship: Let’s define two entity classes User and Address having a one-to-one relationship, using the @OneToOne annotation. The association is owned by the User end of the association.
Many-to-Many Relationship: To create an example of a many-to-many relationship, let’s add a model class Role that will have a many-to-many relationship with the User entity. We would define the many-to-many relationship using @ManyToMany annotation, to which we can add @RestResource.
The @RestResource annotation is optional and can be used to customize the endpoint. We must be careful to have different names for each association resource. Otherwise, we will encounter a JsonMappingException with the message: “Detected multiple association links with same relation type! Disambiguate association”. The association name defaults to the property name and can be customized using the rel attribute of @RestResource annotation:
@OneToOne
@JoinColumn(name = "secondary_address_id")
@RestResource(path = "libraryAddress", rel="address")
private Address secondaryAddress;
If we were to add the secondaryAddress property above to the User class, we would have two resources named address, and we would encounter a conflict.
We can resolve this by specifying a different value for the rel attribute or by omitting the RestResource annotation so that the resource name defaults to secondaryAddress.
User.java
@Entity  // This tells Hibernate to make a table out of this class
@Table(name = "user")
public class User {

	@Id
	@GeneratedValue(strategy = GenerationType.AUTO)
	@Column(name = "user_id")
	private long id;
    @Column(name = "first_name")
	private String firstName;
    @Column(name = "last_name")
	private String lastName;
    @Column(name = "email")
	private String email;
    @Column(name = "password")
	private String password;
    @Column(name = "active")
	private int active;
    @Column(name = "user_name")
	private String username;

  @OneToOne
    @JoinColumn(name = "address_id")
    @RestResource(path = "address", rel="address")
    private Address address;

	@ManyToMany(cascade = CascadeType.MERGE, fetch = FetchType.EAGER)
    @JoinTable(name = "user_role",
               joinColumns = @JoinColumn(name = "user_id"),
               inverseJoinColumns = @JoinColumn(name = "role_id"))
    @JsonIgnoreProperties("users")
    private Set<Role> roles;

    // standard constructor, getters, setters

}
Address.java
@Entity
public class Address {

    @Id
    @GeneratedValue
    private long id;

    @Column(nullable = false)
    private String addressLine1;

    private String addressLine2;

    private String City;

    private String State;

    private String postalCode;

    @OneToOne(mappedBy = "address")
    private User user;

    // standard constructor, getters, setters
}
Role.java
@Entity
@Table(name = "role")
public class Role {

    @Id
    @GeneratedValue(strategy = GenerationType.AUTO)
    @Column(name = "role_id")
    private long id;

    @Column(name = "role")
    private String role;

    @Column(name = "users")
    @ManyToMany(mappedBy = "roles")
    @JsonIgnoreProperties("roles")
    private Set<User> users;

    // standard constructor, getters, setters
}
Create the Repositories
This repository is an interface that lets you perform various operations involving User objects. It gets these operations by extending the CrudRepository interface. At runtime, Spring Data REST automatically creates an implementation of this interface. Then it uses the @RepositoryRestResource annotation to direct Spring MVC to create RESTful endpoints at /users.
Here I have also defined a custom query to retrieve a list of User objects based on the lastName. You can see how to invoke it later in this guide.
UserRepository.java
@RepositoryRestResource(collectionResourceRel = "users", path = "users")
public interface UserRepository extends CrudRepository<User, Long> {

	List<User> findByLastName(@Param("name") String name);
}
AddressRepository.java
public interface AddressRepository extends PagingAndSortingRepository<Address, Long>{

}
RoleRepository.java
public interface RoleRepository extends CrudRepository<Role, Long>{

}
That’s it! We now have a fully-functional REST API.
Spring Boot automatically spins up Spring Data JPA to create a concrete implementation of the UserRepository and configure it to talk to a back end in-memory database by using JPA. This exposes the basic CRUD:
- GET /users
- POST /users
- GET /users/{id}
- PUT /users/{id}
- POST /users/{id}
- PATCH /users/{id}
- DELETE /users/{id}
- HEAD /users/{id}
Spring Data REST builds on top of Spring MVC. It creates a collection of Spring MVC controllers, JSON converters, and other beans to provide a RESTful front end. These components link up to the Spring Data JPA backend. When you use Spring Boot, this is all autoconfigured. If you want to investigate how that works, by looking at the RepositoryRestMvcConfiguration in Spring Data REST.
Accessing the REST API
If we run the application and go to http://localhost:8080/ in a browser, we will receive the following JSON:
{
  "_links" : {
    "addresses" : {
      "href" : "http://localhost:8080/addresses{?page,size,sort}",
      "templated" : true
    },
    "users" : {
      "href" : "http://localhost:8080/users{?page,size,sort}",
      "templated" : true
    },
    "roles" : {
      "href" : "http://localhost:8080/roles{?page,size,sort}",
      "templated" : true
    },
    "profile" : {
      "href" : "http://localhost:8080/profile"
    }
  }
}
As you can see, there is a “/users” endpoint available, and it already has the “?page“, “?size” and “?sort” options.
There is also a standard “/profile” endpoint, which provides application metadata. It is important to note that the response is structured in a way that follows the constraints of the REST architecture style. Specifically, it provides a uniform interface and self-descriptive messages. This means that each message contains enough information to describe how to process the message.
There are no users in our application yet, so going to http://localhost:8080/users would just show an empty list of users.
{
    "_embedded": {
        "users": []
    },
    "_links": {
        "self": {
            "href": "http://localhost:8080/users"
        },
        "profile": {
            "href": "http://localhost:8080/profile/users"
        },
        "search": {
            "href": "http://localhost:8080/users/search"
        }
    },
    "page": {
        "size": 20,
        "totalElements": 0,
        "totalPages": 0,
        "number": 0
    }
}
Let’s use postman to add a user:


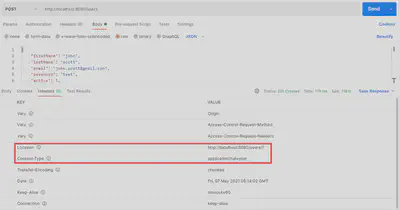
Look at the response headers first:
You will notice that the returned content type is “application/hal+json“. HAL is a simple format that gives a consistent and easy way to hyperlink between resources in your API. The header also automatically contains the Location header, which is the address we can use to access the newly created user.
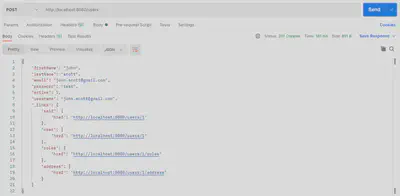
We can now access this user at http://localhost:8080/users/1
{
  "firstName" : "john",
  "lastName" : "scott",
  "email" : "john.scott@gmail.com",
  "password" : "test",
  "active" : 1,
  "username" : "john.scott@gmail.com",
  "_links" : {
    "self" : {
      "href" : "http://localhost:8080/users/1"
    },
    "user" : {
      "href" : "http://localhost:8080/users/1"
    },
    "roles" : {
      "href" : "http://localhost:8080/users/1/roles"
    },
    "address" : {
      "href" : "http://localhost:8080/users/1/address"
    }
  }
}
We can also see in the response body that an association resource has been exposed at the users/{userId}/address endpoint.
Before we create an association, sending a GET request to this endpoint will return HTTP 404. However, if we want to add an association, we must first create an Address instance also:
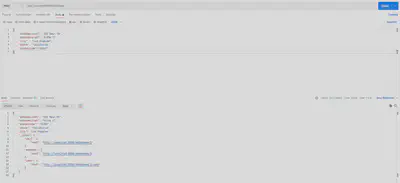
After persisting both instances, we can establish the relationship by using one of the association resources. This is done using the HTTP method PUT, which supports a media type of text/uri-list, and a body containing the URI of the resource to bind to the association. Since the User entity is the owner of the association, let’s add an address to an user:

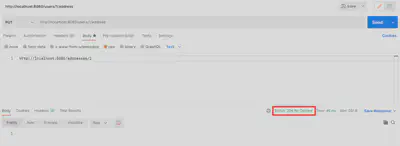
If successful, this returns status 204. To verify, let’s check the user association resource of the address at http://localhost:8080/addresses/2/user
{
  "firstName" : "john",
  "lastName" : "scott",
  "email" : "john.scott@gmail.com",
  "password" : "test",
  "active" : 1,
  "username" : "john.scott@gmail.com",
  "_links" : {
    "self" : {
      "href" : "http://localhost:8080/users/1"
    },
    "user" : {
      "href" : "http://localhost:8080/users/1"
    },
    "address" : {
      "href" : "http://localhost:8080/users/1/address"
    },
    "roles" : {
      "href" : "http://localhost:8080/users/1/roles"
    }
  }
}
To remove an association, we can call the endpoint with DELETE method, making sure to use the association resource of the owner of the relationship: http://localhost:8080/users/1/address

As with the address resource, we must first create the Roles before we can establish the association with User. Let’s first create two user Role instances (USER and ADMIN) by sending POST requests to the /roles collection resource:
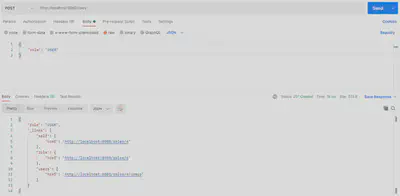
Now we can create an association between the two Book records and the Author record using the endpoint authors/1/books with PUT method, which supports a media type of text/uri-list and can receive more than one URI. To send multiple URIs we have to separate them by a line break:

To verify both roles have been associated with the user, we can send a GET request to the association endpoint: http://localhost:8080/users/1/roles
{
  "_embedded" : {
    "roles" : [ {
      "role" : "ADMIN",
      "_links" : {
        "self" : {
          "href" : "http://localhost:8080/roles/3"
        },
        "role" : {
          "href" : "http://localhost:8080/roles/3"
        },
        "users" : {
          "href" : "http://localhost:8080/roles/3/users"
        }
      }
    }, {
      "role" : "USER",
      "_links" : {
        "self" : {
          "href" : "http://localhost:8080/roles/4"
        },
        "role" : {
          "href" : "http://localhost:8080/roles/4"
        },
        "users" : {
          "href" : "http://localhost:8080/roles/4/users"
        }
      }
    } ]
  },
  "_links" : {
    "self" : {
      "href" : "http://localhost:8080/users/1/roles"
    }
  }
}
To remove an association, we can send a request with DELETE method to the URL of the association resource followed by {roleId}: http://localhost:8080/users/1/roles/3
It also is important to note that Spring Data REST automatically follows the principles of HATEOAS. HATEOAS is one of the constraints of the REST architecture style, and it means that hypertext should be used to find your way through the API.
Finally, lets try to access the custom query that we wrote earlier and find all users with the name “scott”. This is done by going to http://localhost:8080/users/search/findByLastName?name=scott
{
    "_embedded": {
        "users": [
            {
                "firstName": "john",
                "lastName": "scott",
                "email": "john.scott@gmail.com",
                "password": "test",
                "active": 1,
                "username": "john.scott@gmail.com",
                "_links": {
                    "self": {
                        "href": "http://localhost:8080/users/1"
                    },
                    "user": {
                        "href": "http://localhost:8080/users/1"
                    },
                    "roles": {
                        "href": "http://localhost:8080/users/1/roles"
                    }
                }
            }
        ]
    },
    "_links": {
        "self": {
            "href": "http://localhost:8080/users/search/findByLastName?name=scott"
        }
    }
}
Conclusion
This tutorial demonstrated the basics of creating a simple REST API with Spring Data REST. The example used in this article can be found in the linked GitHub project.